
1️⃣ On the left menu, choose Governance, then Meetings.
2️⃣ At the upper right corner, click + New Meeting.
3️⃣ Fill in the details of your meeting by indicating:
- The name you want to give to your meeting (e.g. General Meeting)
- The date of your meeting
- A start time and an end time for your meeting
- If your meeting is to be held in person, the address where your meeting will be held
- If you are allowing participation by video conference, indicate the link to the conference
- It is also possible to add a deadline for responding to the invitation.
After this date, it will not be possible for the attendee to submit a response.
4️⃣ Select the group you wish to invite to the meeting.
💡Your group does not exist yet ? You can create it by clicking on + Add a group.
5️⃣ Check the list of your participants. The participant fields are already pre-filled with the "active" members of the group at the date of your meeting :
- You can manually add or remove any member for this meeting
- If your account has multiple contacts, select the contact you wish to send the meeting invitation to from the contact column.
💡Tapping the Review attendees informations will allow you to check and update, if necessary, your attendees' information.
6️⃣ Fill in the agenda for your meeting. It will appear in the invitation email sent to your guests and in the sidebar of your meeting.
7️⃣ Add below the documents related to your meeting (notice of meeting, text of resolutions, ballot, etc).
⚠️ These documents will be visible to your guests in their Equify space but will not be attached to the invitation email they receive.
If you want to allow your guests to sign a proxy online on Equify, you can select the Equify proxy template that is provided to you.
💡When your guests choose to appoint a proxy on Equify, you will be notified and you can find the signed proxy forms in your Equify library.
8️⃣ In the last step, you can customise the meeting invitation email that will be sent to your guests. You can thus :
- Indicate what you want to appear in the sender field of the invitation emails
- Customise the subject of the email that will be sent and its content
➡️ Guests will, however, receive [Action Required] at the beginning of the object. - Enter an email address for the redirection of direct responses from your invitees to the invitation email
➡️ Only one redirect email is allowed.
💡 At any point in the process of creating your meeting, you can decide to save it as a draft and resume it later.
Once the meeting is created you will be able to modify by clicking on the three dots at the end of the line:

- Documents: import or modify the documents to which the guests have access
- Participants: Add new participants. These participants will receive an invitation email and a reply form.
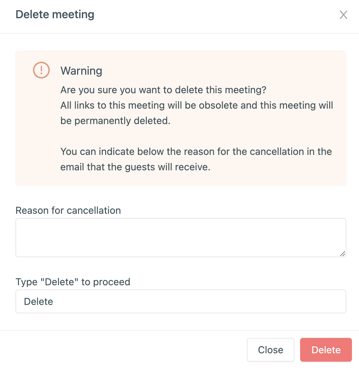
- Cancel a meeting; You can then indicate the reason for the cancellation in the email that the guests will receive:
📌 Once the meeting invitations have been sent out, you will not be able to change the name, meeting details and the invitation email.
Find out how to track responses and follow-up with your invitees in this article:
How to convene your shareholder meetings, boards, committees and track guest responses?